Showing posts with label tutorial. Show all posts

Monday, March 2, 2015

DIY Make-up - How to Cover Dark Circles


I haven't tried this yet, but in theory this could work. The before and after looks pretty amazing. Let me know if you're brave enough to try it!


Makeup Trick to Hide Dark Circles - How to Cover Dark Circles - Good Housekeeping

Thursday, February 26, 2015

Burdastyle: Create Your Own 7 Piece Workout Collection

Workout clothing can be expensive, but it doesn't have to be. BurdaStyle's Meg Healey can show you how to make your very own 7-piece workout collection! That means you can choose your own fabrics and colors so you can throw your own little flair into it… sounds good to me!


Join Meg Healy on February 27th for this new course>>


BurdaStyle For People

Who Sew
February 25, 2015
megworkout
Don't forget to register for this popular course with Meg Healy!


Date: Friday, Feb. 27 | Duration: 6 Weeks | Instructor: Meg Healy | Price: $90.00 $49.99
e-Boutique Web Seminar
Create Your Own 7 Piece Workout Wear Collection


We all know there is a shortage of athletic and workout wear sewing
patterns out there, and they require specific pattern making and sewing
techniques. But now with this brand new course developed my Meg Healy
you'll be guided through the process of drafting and sewing your own
personal collection of workout wear garments.


By the end of this 6 week long course you will have a great
understanding of athletic fabrics an how to sew with them. Better yet,
you will have made a running tank, yoga tank, t-shirt, leggings, shorts,
and yoga pants complete with matching headband!


REGISTER NOW
workout1


REGISTER NOW


Wednesday, February 25, 2015

Monday, July 2, 2012

DIY – Make Your Own Undies

DSCF4653
I have made a lot of things in my life, but undies are truly a new adventure for me. I’ve been meaning to make them for a while now, but just never did. Now, after losing weight some of my existing undies are getting a bit baggy, not to mention I’ve been wearing things more fitted and high waisted. Regular bikini undies or thongs can leave some unsightly panty lines, so I needed something that comes up higher and helps alleviate the dreaded panty lines. Once I made the first pair I couldn’t stop. I also wondered why on earth had I not done this before, because in all honesty, they are quite easy.
Materials:
Old undies to cut up and use for a pattern
Sewing machine
Scissors
Stretchy fabric
Picot Elastic or Fold Over Elastic
Instructions:
DSCF4646
Cut all of the elastic edges off your old undies and cut them apart at the seams. Once you get done you will be left with a perfect pattern. I didn’t take a picture of mine. Suffice it to say that they were quite sad looking, but they fit great, hence the reason why I had not thrown them away. Pin them down on your pretty new fabric and cut out one front, one back and one crotch piece*. For mine I chose to use a polyester knit for the main part of the undies and a cotton knit for the crotch. I used the poly because I didn’t want my clothing to cling to it.
* You should have two layers of fabric in the crotch area. I left one layer (the outer (pretty) layer) attached to the front piece and cut off the inner layer, which is what I cut out of the cotton. If you look at the image you can see that the front pieces are longer and will go between the legs and attach to the back piece.
DSCF4649
My first step was to sew the front, back and crotch piece together. You’ll line up the crotch seams with the front and back right sides together, and then put the crotch piece behind the back piece. Stitch straight across this crotch seam. Please excuse the threads, I screwed this step up the first time.
DSCF4650
Next, you’ll lay them out with the front and back spread out right sides down. Flip the crotch piece so that it covers where you just sewed the three layers together, line it up to the back piece, pin and sew down with a zig zag or stretch stitch.
DSCF4651
Attach the elastic to the leg seams. This is where the fold over elastic(FOE)cot elastic comes in. If you’re not familiar with FOE here’s a little video with instructions for sewing with FOE. Be sure you get both layers when you are sewing through the crotch area.
DSCF4652
Line up the side seams with right sides facing and sew them up. If your fabric has 4-way stretch then use a stretch stitch or zig zag, otherwise a straight stitch is fine. You can also use a serger, but since they were for me I didn’t bother.
DSCF4653
Add elastic to the top. You can use the FOE, picot elastic, or be like me and use some pretty stretch lace.
DSCF4654
If you’re like me, you can’t stop at just one pair.
DSCF4655
This is a great way to use up your stash, scraps and even old tees. The crotch pieces on all of these came from t-shirt sleeves that were cut up and turned in to tanks and summery tops like this:
DSCF4641

The polka dot fabric is something that I ordered, but when it came in it was quite thin and flimsy so I never really used it. The burgundy that is peeking out is some random fabric that I found in a scrap bin. It has a weird texture, but it holds it’s shape and clothing doesn’t cling to it, so it was perfect for undies.
If anything is unclear feel free to ask questions. I can’t wait to make some more, so if you need more pics or explanation I will be glad to give it.
Labels: ,

Wednesday, June 6, 2012

DIY – Fringe Beaded Tank

Neon colors and the 80’s are popping up everywhere for summer, so I decided to give some of my old pride tees a makeover. You can do it too!
67d4210f37c738c8a7ef605ddba7a481_87776_lrg
I started with this tee:
DSCF1200b
Then I followed this simple tutorial to chop into a tank:


It’s super easy. You just cut off the sleeves, cut off the neckline, cut off the original hem and use the hem to wrap around the back to make it a racer back.
Then I cut the bottom into fringe:
DSCF4637
I folded my tee in half to make the cutting go quicker. I like to keep my cuts at about a 1/2 inch or less. Any wider and it get too think to fit through the bead hole.
Next, I started pulling the fringe so it would curl up, and sliding beads on. Once I had all the beads I wanted on then I tied a knot about 1/2 inch from the bottom.
30dd3ac276f801fcd397a08793c9b8db_135096_lrg
When you’re done you should have something similar to this:
67d4210f37c738c8a7ef605ddba7a481_87776_lrg  
I also did a tee with fringe sleeves. We’ll discuss that one later. I forgot to take a pic.
The tanks will be available at Augusta Pride on June 23rd for $25. If you would like one before then to wear at the festival you can shoot me an email or contact me through Facebook or Etsy. Any tanks left over after the festival will go in my Etsy Shop.
Labels:

Tuesday, January 10, 2012

Pinterest – DIY Projects and Tips

I finally got sucked into the world of  Pinterest. At first I was thinking that I wouldn’t really be into it. It just seemed like another thing to maintain, but once I realized I could pretty much pin anything I saw online I was in love. Often times I see things that I would love to feature on my blog, but I don’t have the time to actually write a post right that second. I had started a method of saving these things, but it was still a bit time consuming. Pinterest to the rescue! As I scour over the internet all I have to do is click my nifty little Pin It button and voila….it is saved!

I currently have 7 different boards:

Say What?

– A collection of posters and sayings that I like.

Living Room Inspiration

– This is just what it sounds like. Since we’ve moved I have a chance to redecorate my living room again.  Many of the pieces are staying the same, but there will be some changes and definitely and updated post.

Recipes
DIY Home

- Various DIY Projects for the home.

DIY Projects and Tips

- DIY Projects not related to the home. Mostly fashion.

DIY Gifts
Loves

- Random things that I just really like.

Here are some of the first pins from my DIY Projects and Tips Board:

(All images are links)

Polo refashion

Polo Shirt Refashion from Merrick’s Art

BowBackShirt

Bow Back Shirt by Inspiration & Realisation

Nails

Manicure Using Scrapbooking Scissors on Chloe’s Nails

halter 5

DIY Halter by Wobisobi


Happy Crafting!

Saturday, November 12, 2011

DIY Tutorial Link - Ornament Light

This is gorgeous, and it’s just wire, lights and clear Christmas ornaments.
light-10
Find out how to make it here at Crafted Niche.

Sunday, November 6, 2011

DIY Inspiration and Mini Tutes – Free People November Catalog – Part 2

Sequined Button Down
23735343_011_0
Button down, sequins or sequin fabric and glue or needle and thread….the rest should pretty self explanatory.
e6000-glue-100g-2
Fringe Belt 
23798689_020_a
This little gem could easily made from an old belt and some scrap leather. Cut some leather long enough for the belt, cut fringy bits and glue it on. You could glue it on top, or underneath. Use matching leather or not…the choice is yours!
e6000-glue-100g-3
Studded Band Tee
23864325_010_a
How can you resist studding a band tee??? You can’t get anymore simple, glue them sew them, attach them however necessary. You don’t even have to just use stud, sequins and beads would too. Just have fun with it!
e6000-glue-100g-4

Saturday, November 5, 2011

DIY Inspiration & Mini Tutes – Free People November Catalog – Part 1

20827903_023_e
Just glue some ribbon onto some ballet flats with E6000 and you’re all set.
e6000-glue-100g-1
22921308_004_c
Take one jacket (leather, denim whatever you want) and bead, sequin and stud the back shoulders how ever you see fit. You can choose to sew them all on, or use some trusty E6000.
studs-1
23700099_010_a
This long lace skirt is ridiculously easy as well. You can use scalloped edged lace, a table, curtain, or anything else lace that is big enough. Simply make a rectangle big enough to go around you comfortably, make a casing in the top, insert elastic and voila. It can be sewn by hand or sewing machine, you could probably even get away with gluing it, thought that wouldn’t be my first choice.
563579-needle-and-thread-1

Thursday, October 27, 2011

Pumpkin Inspiration and Tutorial Links

Since Halloween is right around the corner I figured we could all use a little pumpkin inspiration! (All images are links)


Illustrated and Carved Pumpkins


Jack Skellington Pumpkin


Self Portrait Pumpkin


Decoupaged Pumpkins


Harry Potter


DIY Tutorial Link - Missoni Sneakers

Did you miss out on the Target Missoni Collection? Refinery 29 can show you how to make your own.


Check out the tutorial here.

Wednesday, October 26, 2011

DIY Tutorial Link - Glitter Sneakers

How can you not love Love Maegan. She's gorgeous and she has the most awesome tutorials. I am digging her new glitter sneakers. If I actually wore sneakers I might have to try this. Instead, I think I will glitter up a pair of heels.


See her tutorial here.

Tuesday, October 25, 2011

DIY Tutorial Link - Citrasolv Transfer

Lil Blue Boo has done it again. This Citrasolv transfer has the look of comfy vintage tee. I am going to have to try this.


Read the tutorial and try it for yourself here.

Monday, October 24, 2011

DIY: Craft Show Hanging Signage

If you've already read my previous tutorial about the free standing craft show signage then this tutorial is should be pretty self explanatory. When I was preparing for my most recent show I needed free standing signage and hanging signage. I've already covered my free standing signage, so now we're on to the hanging.


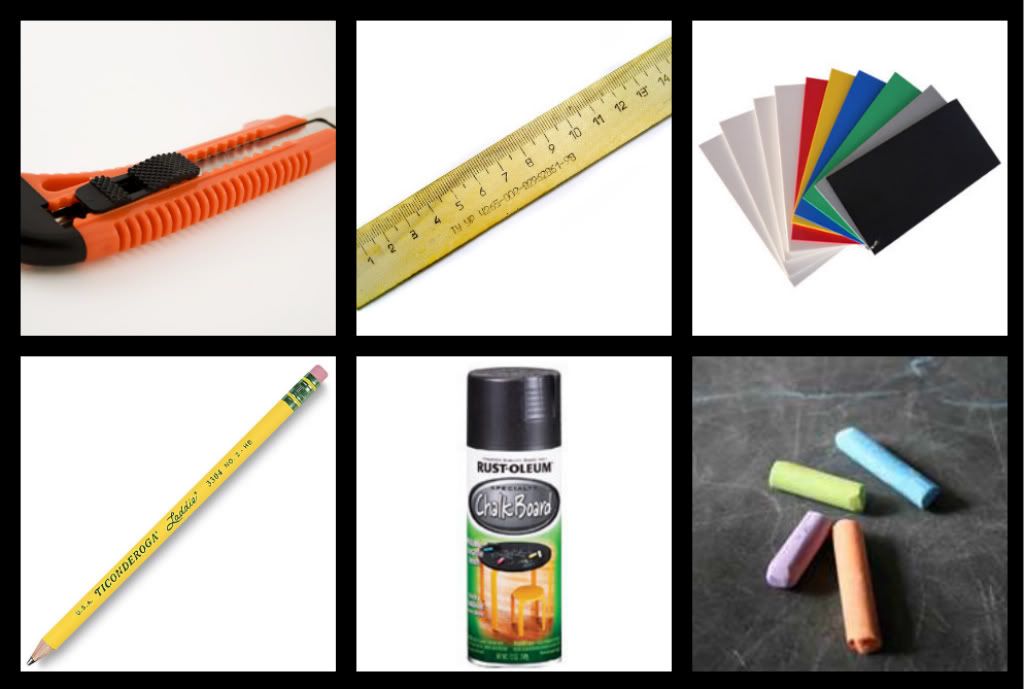
Materials

- Foam board or plywood (I used foam board because I wanted something lightweight and cheap)
- Pencil
- Ruler, yard stick or some sort of measuring device/straight edge
- Box Cutter, knife, razor blade, scissors, or some sort of cutting instrument suitable for your material
- Chalk Board Paint
- Chalk
- Hanging materials

Directions:

1. Decide what size you want your signs to be and then measure and cut your foam board/plywood. I bought 20x30 foam board, so I cut it in six equal 10x10 squares.

2. Now you follow the directions on the chalk board paint. Spray 2 thin coats, let dry for 24 hours, then condition the surface by rubbing the side of the chalk all over the painted surface, then wipe clean.

3. Decide how you want them to hang. Do you just want to use some double stick tape and stick them to something, or do they need to hang from string or ribbon? For mine I needed to be able to hang them from things, not tape them to things. I used my leather punch to punch two holes along the top edge, and then ran curling ribbon through the holes, and ta-da I had a sign. I could hang it from clothing racks, around mannequin necks, etc.