Monday, October 31, 2011

Oops


Sorry for not posting yesterday. I managed to get a nasty cold over Halloween weekend, so yesterday was spent resting. Here's a pretty picture from Vegas to tide you over.

Friday, October 28, 2011

Last Minute Costume Ideas

Halloween is almost here, and I know some of you have waited until the last minute to find a costume. Here are some ideas that could be made fairly quickly for not a whole lot of moolah. (All images are links)


Pair these wings with leggings and a tunic or a cute dress.


Smurfette


Swamp Girl - The instructions are for a kid, but this could easily be made for an adult.


Nicki Minaj - Find something tacky and slutty and get a crazy wig...you get the idea.


Lady Gaga as Joe Calderone - Hit up the thrift store or raid a closet for a blazer and pants, get an Elvis wig and bum a cigarette....easy peasy!


Foxy Brown - Hit the thrift store and grab a fro!


Flash Dance - Depends on the route you want to go, but you could potentially have all this in your closet.


Thursday, October 27, 2011

Pumpkin Inspiration and Tutorial Links

Since Halloween is right around the corner I figured we could all use a little pumpkin inspiration! (All images are links)


Illustrated and Carved Pumpkins


Jack Skellington Pumpkin


Self Portrait Pumpkin


Decoupaged Pumpkins


Harry Potter


DIY Tutorial Link - Missoni Sneakers

Did you miss out on the Target Missoni Collection? Refinery 29 can show you how to make your own.


Check out the tutorial here.

Wednesday, October 26, 2011

DIY Tutorial Link - Glitter Sneakers

How can you not love Love Maegan. She's gorgeous and she has the most awesome tutorials. I am digging her new glitter sneakers. If I actually wore sneakers I might have to try this. Instead, I think I will glitter up a pair of heels.


See her tutorial here.

Tuesday, October 25, 2011

DIY Tutorial Link - Citrasolv Transfer

Lil Blue Boo has done it again. This Citrasolv transfer has the look of comfy vintage tee. I am going to have to try this.


Read the tutorial and try it for yourself here.

Monday, October 24, 2011

DIY: Craft Show Hanging Signage

If you've already read my previous tutorial about the free standing craft show signage then this tutorial is should be pretty self explanatory. When I was preparing for my most recent show I needed free standing signage and hanging signage. I've already covered my free standing signage, so now we're on to the hanging.


Materials

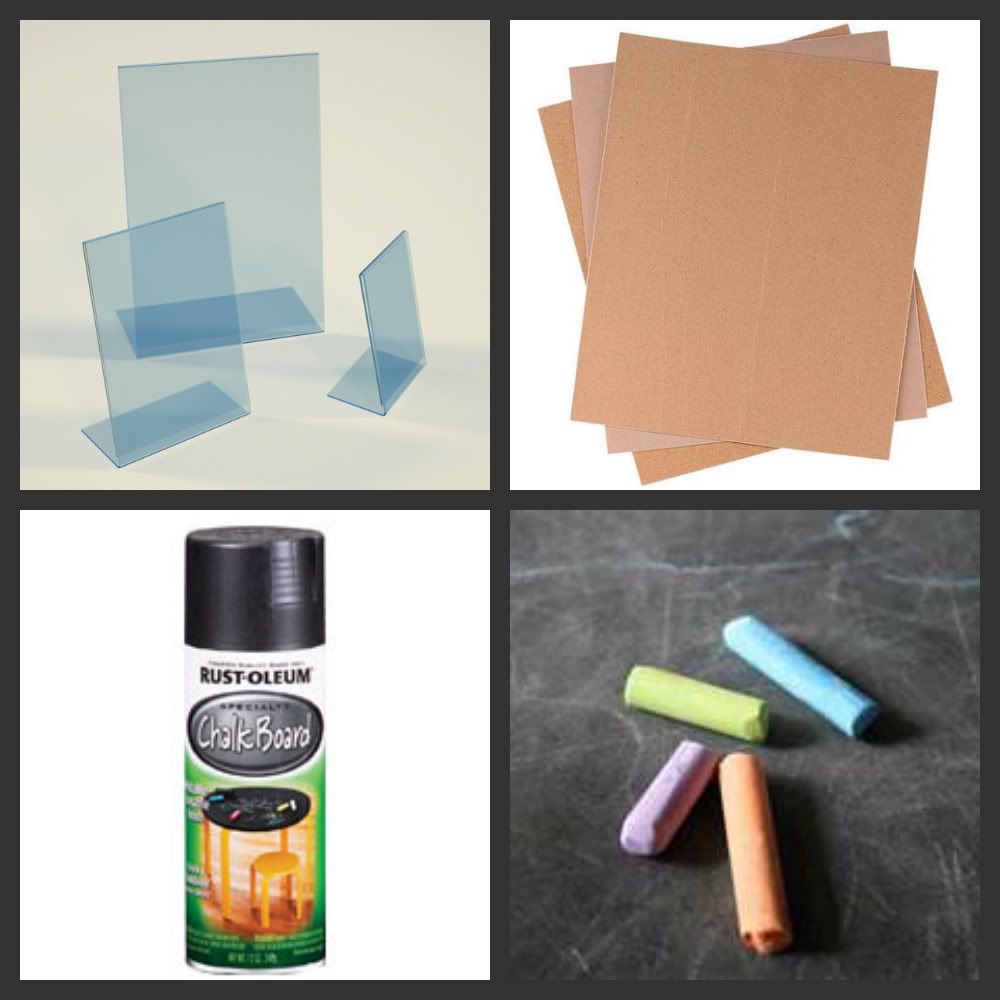
- Foam board or plywood (I used foam board because I wanted something lightweight and cheap)
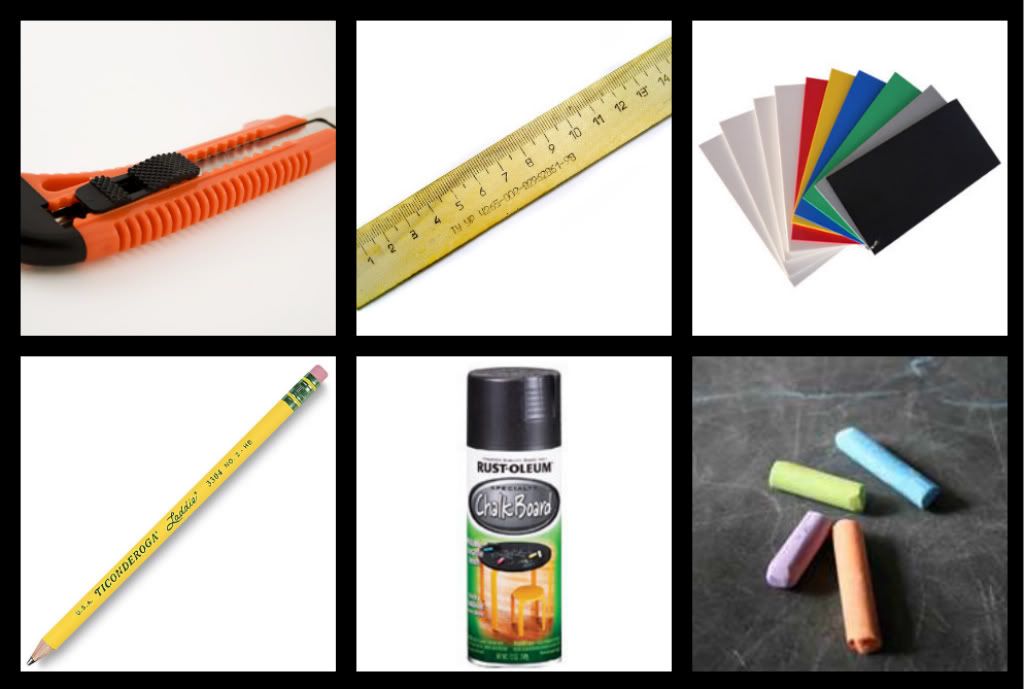
- Pencil
- Ruler, yard stick or some sort of measuring device/straight edge
- Box Cutter, knife, razor blade, scissors, or some sort of cutting instrument suitable for your material
- Chalk Board Paint
- Chalk
- Hanging materials

Directions:

1. Decide what size you want your signs to be and then measure and cut your foam board/plywood. I bought 20x30 foam board, so I cut it in six equal 10x10 squares.

2. Now you follow the directions on the chalk board paint. Spray 2 thin coats, let dry for 24 hours, then condition the surface by rubbing the side of the chalk all over the painted surface, then wipe clean.

3. Decide how you want them to hang. Do you just want to use some double stick tape and stick them to something, or do they need to hang from string or ribbon? For mine I needed to be able to hang them from things, not tape them to things. I used my leather punch to punch two holes along the top edge, and then ran curling ribbon through the holes, and ta-da I had a sign. I could hang it from clothing racks, around mannequin necks, etc.

Sunday, October 23, 2011

DIY Tutorial Link - Placemat Clutch

I am loving this clutch. It has a very South Western vibe, which is very in right now.


Of course you can use whatever kind of place mat you want. Just follow Lil Blue Boo's Tutorial to make your own.

Saturday, October 22, 2011

DIY Tutorial Link - Stuffed Animal Game Head

I know this is meant for a kid's room, but I love it. I think I have a big stuffed leopard somewhere that just might get sacrificed for the sake of my home decor.


Jump on to I Love to Create to see the tutorial.

Friday, October 21, 2011

DIY Tutorial Link - Costumes Contest Trophies

Here's your chance to make your Halloween Costume Contest truly unique with these awesomely creepy trophies.


You could make them bronze, silver and gold for 3rd, 2nd and 1st place
OOOooo you could do a head, hand and foot for 1st, 2nd and 3rd.
Find out how to make your own over at Very Vegan Holiday.

Thursday, October 20, 2011

Wednesday, October 19, 2011

DIY Tutorial Link - Spooky Drapes

Are you in need of inexpensive last minute Halloween decor? Yes...good then this is perfect for you. You might not even have to leave your house for supplies.


Check out Create for the super simple tutorial.

Tuesday, October 18, 2011

DIY Tutorial Link - Googly Eyed Busts

I can't let Halloween roll by without featuring some Halloween DIY goodness. I L-O-V-E these. They are spooky and cute all at the same time.


Run on over, or fly on your broom over to Design DNA to check out the tutorial.

Monday, October 17, 2011

Traveling - Hilton Head, SC

Once again work has carried me to a new destination. This time I was working a conference in Hilton Head, SC. Here are some pretty pics for your viewing pleasure. These were actually my view from conference site every day.


While we were there we played Pirate Adventure Miniature Golf. I won one game, and the hubby won one, we had fun. I snapped some fun pictures while we were on the course.


The final day I snapped a couple pictures as we were leaving.


Can you guess where my next adventure will be. Here's a hint....the initials are LV.

Sunday, October 16, 2011

DIY: Craft Show Free Standing Signage

I was about to do my big show of the year, and I was revamping a lot of my display. I had always tried to make my signage look creative and professional, and I tried to think of every possible sign I would need before each show and it never failed, I would always wind up having to hand write a sign or two on site. Luckily I have good handwriting, but it still wasn't as cohesive as it could have been, so I started brainstorming. I had been seeing chalkboard paint used for various things all over the blogger world, and it hit me....that is perfect. All I had to do was to figure out what I was going to spray, which I did, and tah-dah my new signage was born. You can do it too, here's how:

Materials:


Acrylic Frames (or anything flat that you can spray that fits your needs)
Fine Grit Sand Paper
Chalkboard Paint
Chalk

Once you've bought these few things, the rest is actually really easy.

1. Lightly sand the surfaces you will be spraying to give them just a bit of texture. This will help your ability to write on the surface. Make sure you get all of the dust off the surface.

2. Then you follow the directions on your chalkboard paint for the rest. For the paint I used you had to spray at least 2 thin coats of paint, let it sit 24 hours and then condition it with chalk by rubbing the chalk all over it using the side of the chalk and then wiping it all off. After that you should have a chalk board surface.


These were great for my show. When I would start running low on something, or would sell out I could easily change the sign and then highlight another item, or change my special deals for the day, etc. They were sturdy, didn't take up much room and they were inexpensive. I made 10 of these, 10 hanging signs (tute coming soon) and a necklace display (tute coming soon) for less than $20.

Saturday, October 15, 2011

Arts in the Heart

Arts in the Heart is local festival here in Augusta that celebrates culture, arts and music, They have food tents that feature unique dishes from around the world, performances that showcase different cultures, and arts and crafts. This year was my fourth year being a vendor. This was my biggest year yet, and I loved it. In the past I had always just used one booth space, but this year I opted for two since I was introducing my kids line of clothing, Ankle Biter Apparel, as well as new products for my adult line. It was a ton of work. I worked for three months straight creating tons of newness, but nothing prepared me for the day of. I was used to setting up my one little 10x10 area, and I had it down to a science. I could have it set up in about an hour, hour and half, but the two booth spaces and revamped display took every bit of five hours, followed by numerous tweaks throughout the festival.


I introduced my new Kimono Jackets, as well as recycled purses.


Here is my revamped Kid's wall.


I always like to have one great attention grabbing piece up front to draw people in. This is one that I used during the festival. I got so excited, I almost sold it, but unfortunately the customer's boyfriend wasn't as excited about it as she was.


Here are some more pics of my set-up during the festival.


Here are my pitiful racks towards the end of the day Sunday (the final day). These were super full in the beginning.


DIY signage and display ideas will be coming soon based on things I used at this year's festival.


Friday, October 14, 2011

Recipe Link - Chili Cheese Dip

I love me some good junk food, especially anything with chili and cheese. Happy Hour Projects has a super simple Chili Cheese Dip that is perfect for your next get together.


Thursday, October 13, 2011

Wednesday, October 12, 2011

Yumm

Pineapple, vodka and a splash of grenadine